项目介绍 该项目是实现从移动端在商城购物
项目文件目录 1 2 3 4 5 6 7 8 9 10 11 12 13 14 15 16 17 18 19 20 21 22 23 24 25 26 27 28 29 30 31 32 33 34 35 36 37 38 39 40 41 42 43 44 45 46 47 48 49 50 51 52 53 54 55 src │ ├── api // 接口 │ ├── address.js │ ├── cart.js │ ├── category.js │ ├── home.js │ ├── login.js │ ├── order.js │ ├── product.js │ └── user.js | ├── assets // 存放静态资源,如图片(测试时用的图片) | ├── components // 存放 Vue 组件 │ ├── CountBox.vue // 数字的加减框 │ ├── GoodsItem.vue // 每个商品的介绍块 │ └── OrderListItem.vue // 购买商品的订单 │ ├── views │ ├── layout // 布局相关视图 │ │ ├── cart.vue // 购物车 │ │ ├── category.vue // 分类 │ │ ├── home.vue // 首页 │ │ ├── index.vue │ │ └── user.vue // 我的 │ ├── login.vue // 登录(注册)页面 │ │ └── index.vue │ ├── order.vue // 订单页面 │ │ └── index.vue │ ├── pay.vue // 支付页面 │ │ └── index.vue │ ├── productDetail.vue // 产品页面 │ │ └── index.vue │ └── search.vue // 搜索页面 │ ├── index.vue │ └── list.vue │ ├── router // 路由配置 │ └── index.js │ ├── store // 状态管理 │ └── modules │ | ├── cart.js │ | └── user.js │ └── index.js | ├── utils │ ├── request.js │ ├── storage.js │ └── vant-ui.js | ├── main.js │ └── App.vue // 主应用组件
文件介绍 1.App.vue
<router-view/>,在不同路由之间进行内容切换
1 2 3 4 5 6 7 8 9 <template> <div id="app"> <router-view/> </div> </template> <style lang="less"> </style>
2.main.js
Vue.config.productionTip = false 关闭Vue在生产环境下的提示,减少控制台的警告信息
router将路由配置传入实例,开启路由功能
store将Vuex存储传入,允许整个应用访问共享状态
render: h => h(App)定义渲染函数,将App组件渲染为根组件
.$mount('#app')将app挂载到HTML页面上具有“id=app”的元素中
1 2 3 4 5 6 7 8 9 10 11 12 13 import Vue from 'vue' import App from './App.vue' import router from './router' import store from './store' import '@/utils/vant-ui' import '@/styles/common.less' Vue.config.productionTip = false new Vue({ router, store, render: h => h(App) }).$mount('#app')
3.utils 文件夹下面存放着工具
request.js 对HTTP请求工具的配置,有请求拦截器,响应拦截器
请求拦截器,顾名思义就是在发送请求的时候拦截请求,先执行请求拦截器里面的代码,请求拦截器里面有两部分要执行的代码,第一个是loading加载动画,第二个是获取用户的身份令牌(token)
响应拦截器,对服务器返回的数据进行处理和统一管理,
如果服务器返回的状态码不是200,就会将错误信息以Toast弹出相应的错误
axios 是一个基于promise的HTTP客户端,让开发者发起HTTP请求,并处理响应数据
1 2 3 4 5 6 7 8 9 10 11 12 13 14 15 16 17 18 19 20 21 22 23 24 25 26 27 28 29 30 31 32 33 34 35 36 37 38 39 40 41 42 43 44 45 46 47 48 49 50 51 // 创建axios实例,将来对创建出来的实例进行自定义配置 const instance = axios.create({ // 请求基础地址,后面接口地址拼接在这里(后续的请求都将基于这个 URL) baseURL: 'http://smart-shop.itheima.net/index.php?s=/api', // 请求超时时间 5s timeout: 5000 }) // 自定义配置 请求/响应 拦截器 // 添加请求拦截器 instance.interceptors.request.use(function (config) { // 在发送请求之前做些什么 // 开启loading,禁止背景点击 Toast.loading({ message: '加载中...', forbidClick: true, // 禁止背景点击 loadingType: 'spinner', // 配置loading图标 duration: 0 // 不会自动消失 }) const token = store.getters.token if (token) { config.headers['Access-Token'] = token config.headers.platform = 'H5' } return config }, function (error) { // 对请求错误做些什么 return Promise.reject(error) }) // 添加响应拦截器 instance.interceptors.response.use(function (response) { // 2xx 范围内的状态码都会触发该函数。 // 对响应数据做点什么(默认axios会多返回一个data属性,这里直接返回data) const res = response.data if (res.status !== 200) { Toast(res.msg) } else { // 关闭loading Toast.clear() } return res }, function (error) { // 超出 2xx 范围的状态码都会触发该函数。 // 对响应错误做点什么 return Promise.reject(error) }) // 导出配置好的实例 export default instance
storage.js 将个人信息和搜索记录存储到本地(***新添功能在个人中心的昵称变成登录时的手机号)
1 2 3 4 5 6 7 8 9 10 11 12 13 14 15 16 17 18 19 20 21 22 23 24 25 26 27 28 29 30 31 32 33 34 // 规定一个通用的键名 // 获得个人信息 const INFO_KEY = 'shopping_app' export const getInfo = () => { const defaultObject = { token: '', userId: '' } const result = localStorage.getItem(INFO_KEY) return result ? JSON.parse(result) : defaultObject } // 设置个人信息 export const setInfomation = (obj) => { localStorage.setItem(INFO_KEY, JSON.stringify(obj)) } // 移除个人信息 export const removeInfomation = () => { localStorage.removeItem(INFO_KEY) } // 搜索 const HISTORY_KEY = 'history_list' // 获取搜索历史 export const getHistoryList = () => { const result = localStorage.getItem(HISTORY_KEY) return result ? JSON.parse(result) : [] } // 设置搜索历史 export const setHistoryList = (arr) => { localStorage.setItem(HISTORY_KEY, JSON.stringify(arr)) }
vant-ui.js 引入并注册vant组件
统一注册和使用vant组件
1 2 3 4 5 6 7 8 9 10 11 12 13 14 15 16 17 18 19 20 21 // 引入vant组件库 import Vue from 'vue' import { Rate, Tab, Tabs, Checkbox, Dialog, ActionSheet, Lazyload, Icon, Search, Swipe, SwipeItem, Grid, GridItem, Tabbar, TabbarItem, NavBar, Toast } from 'vant' Vue.use(Rate) Vue.use(Tab) Vue.use(Tabs) Vue.use(Checkbox) Vue.use(Dialog) Vue.use(ActionSheet) Vue.use(Lazyload) Vue.use(Icon) Vue.use(GridItem) Vue.use(Search) Vue.use(Swipe) Vue.use(SwipeItem) Vue.use(Grid) Vue.use(Tabbar) Vue.use(TabbarItem) Vue.use(NavBar) Vue.use(Toast)
4.components文件夹 封装的组件
CountBox.vue 加减框的一个组件,用于加入购物车的商品数量,直接购买的商品数量,以及在购物车里面改变商品数量
这里定义两个函数,一个是增加,一个是减少,在函数里面通过emit将当前商品的数量传递到父组件,如下
1 2 3 4 5 6 7 8 9 10 11 <CountBox @input="(value) => changeCount(value, item.goods_id, item.goods_sku_id)" :value="item.goods_num"></CountBox> **** changeCount (goodsNum, goodsId, goodsSkuId) { // console.log(goodsNum, goodsId, goodsSkuId) // 调用 vuex 的 action,进行数量的修改 this.$store.dispatch('cart/changeCountAction', { goodsNum, goodsId, goodsSkuId }) }
调用调用 vuex 的 action,进行数量的修改
对输入框设置了一个检查函数,当输入框里面的内容改成文本或负值,输入框里面的内容就会变成原来的数字
1 2 3 4 5 6 7 8 9 10 11 12 13 14 15 16 17 18 19 20 21 22 23 24 25 26 27 28 29 30 31 32 33 34 35 36 37 38 39 40 41 42 <template> <div class="count-box"> <button @click="handleSub" class="minus">-</button> <input :value="value" @change="handleChange" class="inp" type="text"> <button @click="handleAdd" class="add">+</button> </div> </template> <script> export default { name: 'CountBox', props: { value: { type: Number, default: 1 } }, methods: { handleSub () { if (this.value <= 1) { return } this.$emit('input', this.value - 1) }, handleAdd () { this.$emit('input', this.value + 1) }, handleChange (e) { // console.log(e.target.value) const num = +e.target.value // 转数字处理 (1) 数字 (2) NaN // 输入了不合法的文本 或 输入了负值,回退成原来的 value 值 if (isNaN(num) || num < 1) { e.target.value = this.value return } this.$emit('input', num) } } } </script>
GoodsItem.vue商品组件
OrderListItem.vue订单组件
页面实现 layout主要的四个页面,包括home,category,cart,user
index是展示的页面,home,category,cart,user分别是二级路由
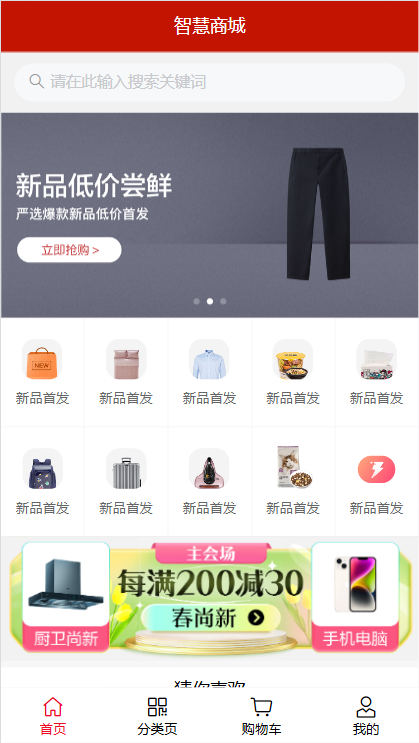
home 主页
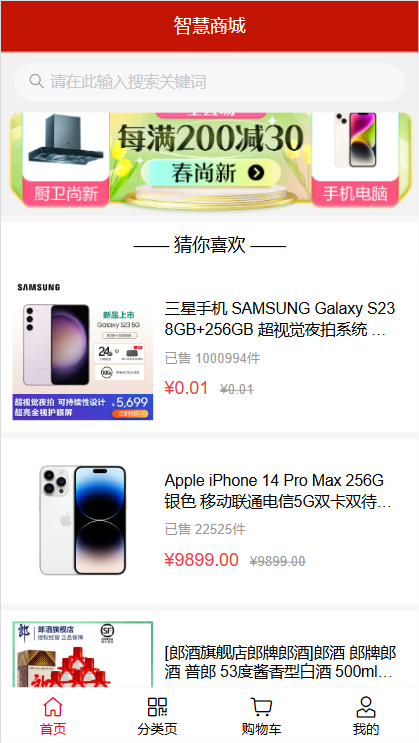
页面有搜索框,轮播图,商品种类(导航),主会场,推荐商品
1 2 3 4 5 6 7 8 9 10 11 12 13 14 15 16 17 18 19 20 21 22 23 24 25 26 27 28 29 30 31 32 33 34 35 36 37 38 39 40 41 42 43 44 45 46 <template > <div class ="home" > <van-nav-bar title ="智慧商城" fixed /> <van-search readonly shape ="round" background ="#f1f1f2" placeholder ="请在此输入搜索关键词" @click ="$router.push('/search')" /> <van-swipe class ="my-swipe" :autoplay ="3000" indicator-color ="white" > <van-swipe-item v-for ="item in bannerList" :key ="item.imgUrl" > <img :src ="item.imgUrl" alt ="" > </van-swipe-item > </van-swipe > <van-grid column-num ="5" icon-size ="40" > <van-grid-item v-for ="item in navList" :key ="item.imgUrl" :icon ="item.imgUrl" text ="新品首发" @click ="$router.push('/category')" /> </van-grid > <div class ="main" > <img src ="@/assets/main.png" alt ="" > </div > <div class ="guess" > <p class ="guess-title" > —— 猜你喜欢 ——</p > <div class ="goods-list" > <GoodsItem v-for ="item in proList" :key ="item.goods_id" :item ="item" > </GoodsItem > </div > </div > </div > </template >
created在组件创建时调用,异步获取商品信息
为什么要异步获取商品信息
因为数据是从服务器上传来的,不是本地的,浏览器需要通过网络请求来获取数据
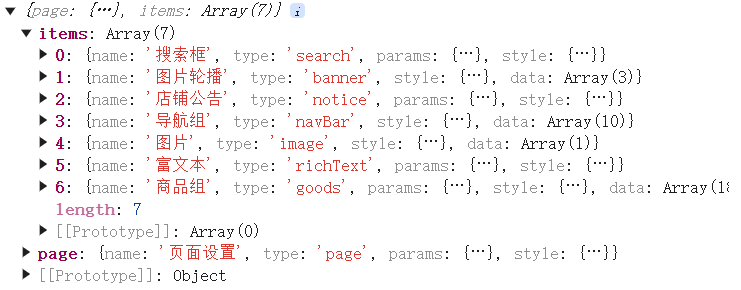
1 2 3 4 5 6 7 8 9 10 11 12 13 14 15 16 17 18 19 20 21 22 23 <script> import GoodsItem from '@/components/GoodsItem.vue' import { getHomeData } from '@/api/home' export default { name : 'HomePage' , components : { GoodsItem }, data () { return { bannerList : [], navList : [], proList : [] } }, async created () { const { data : { pageData } } = await getHomeData () this .bannerList = pageData.items [1 ].data this .navList = pageData.items [3 ].data this .proList = pageData.items [6 ].data } } </script>
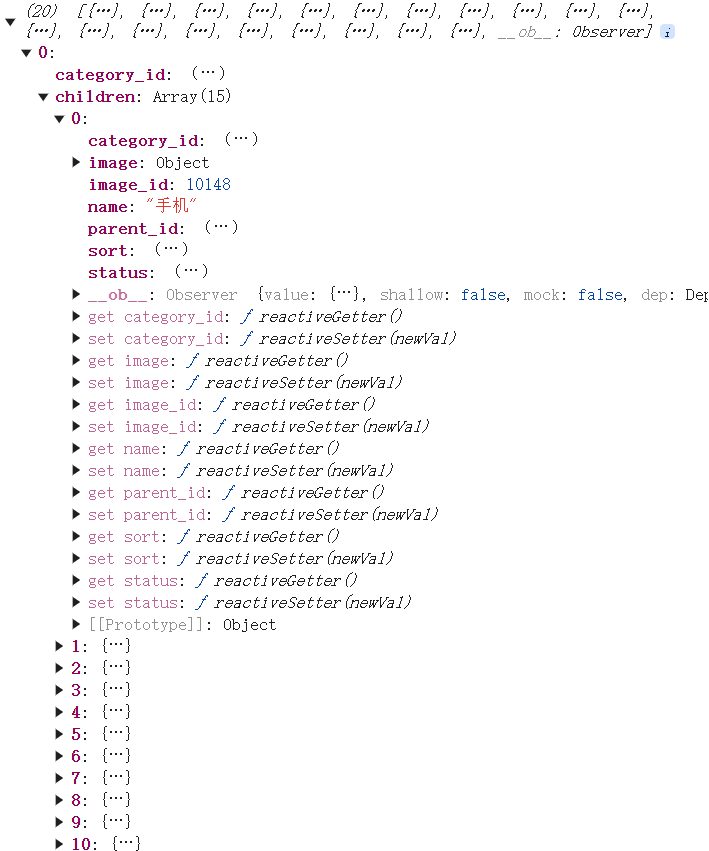
由图可以看出,输出api/homegetHomeData返回的数据,选择items[1].data
1 2 3 4 5 6 7 8 9 10 11 12 13 14 15 16 17 18 19 20 21 22 23 24 25 26 27 28 29 30 31 32 33 34 35 36 37 38 39 40 41 42 43 44 45 46 47 48 49 50 51 52 53 54 55 <style lang="less" scoped> // 主题 padding .home { padding-top : 100px ; padding-bottom : 50px ; } // 导航条样式定制 .van-nav-bar { z-index : 999 ; background-color : #c21401 ; ::v-deep .van-nav-bar__title { color : #fff ; } } // 搜索框样式定制 .van-search { position : fixed; width : 100% ; top : 46px ; z-index : 999 ; } // 分类导航部分 .my-swipe .van-swipe-item { height : 185px ; color : #fff ; font-size : 20px ; text-align : center; background-color : #39a9ed ; } .my-swipe .van-swipe-item img { width : 100% ; height : 185px ; } // 主会场 .main img { display : block; width : 100% ; } // 猜你喜欢 .guess .guess-title { height : 40px ; line-height : 40px ; text-align : center; } // 商品样式 .goods-list { background-color : #f6f6f6 ; } </style>
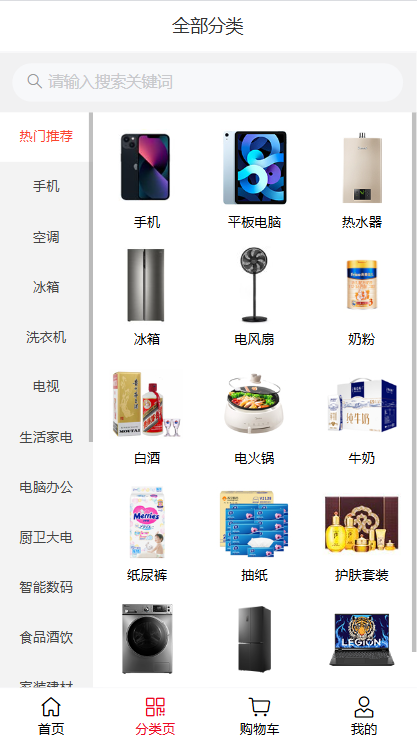
category 分类页
页面有搜索框,商品分类
1 2 3 4 5 6 7 8 9 10 11 12 13 14 15 16 17 18 19 20 21 22 23 24 25 26 27 28 29 30 31 32 33 34 35 36 37 38 39 40 41 42 43 44 45 46 47 48 49 50 51 52 53 54 55 56 57 58 59 60 61 62 63 64 65 66 67 68 69 70 71 72 73 74 75 76 77 78 79 80 81 82 83 84 85 86 87 88 89 90 91 92 93 94 95 96 97 98 99 100 101 102 103 104 105 106 107 108 109 110 111 112 113 114 115 116 117 118 119 120 121 122 123 124 125 126 <template > <div class ="category" > <van-nav-bar title ="全部分类" fixed /> <van-search readonly shape ="round" background ="#f1f1f2" placeholder ="请输入搜索关键词" @click ="$router.push('/search')" /> <div class ="list-box" > <div class ="left" > <ul > <li v-for ="(item, index) in list" :key ="item.category_id" > <a :class ="{ active: index === activeIndex }" @click ="activeIndex = index" href ="javascript:;" > {{ item.name }}</a > </li > </ul > </div > <div class ="right" > <div @click ="$router.push(`/searchlist?categoryId=${item.category_id}`)" v-for ="item in list[activeIndex]?.children" :key ="item.category_id" class ="cate-goods" > <img :src ="item.image?.external_url" alt ="" > <p > {{ item.name }}</p > </div > </div > </div > </div > </template > <script > import { getCategoryData } from '@/api/category' export default { name : 'CategoryPage' , created () { this .getCategoryList () }, data () { return { list : [], activeIndex : 0 } }, methods : { async getCategoryList () { const { data : { list } } = await getCategoryData () this .list = list } } } </script > <style lang ="less" scoped > // 主题 padding .category { padding-top : 100px ; padding-bottom : 50px ; height : 100vh ; .list-box { height : 100% ; display : flex; .left { width : 85px ; height : 100% ; background-color : #f3f3f3 ; overflow : auto; a { display : block; height : 45px ; line-height : 45px ; text-align : center; color : #444444 ; font-size : 12px ; &.active { color : #fb442f ; background-color : #fff ; } } } .right { flex : 1 ; height : 100% ; background-color : #ffffff ; display : flex; flex-wrap : wrap; justify-content : flex-start; align-content : flex-start; padding : 10px 0 ; overflow : auto; .cate-goods { width : 33.3% ; margin-bottom : 10px ; img { width : 70px ; height : 70px ; display : block; margin : 5px auto; } p { text-align : center; font-size : 12px ; } } } } } // 导航条样式定制 .van-nav-bar { z-index : 999 ; } // 搜索框样式定制 .van-search { position : fixed; width : 100% ; top : 46px ; z-index : 999 ; } </style >
:class 动态绑定语法:当index === activeIndex 时,添加active类名
@click 当用户点击这个a标签时,触发点击事件,将index的值赋值给activeIndex
href="javascript:;"这样可以防止页面跳转或刷新
1 <a :class ="{ active: index === activeIndex }" @click ="activeIndex = index" href ="javascript:;" > {{ item.name }}</a >
@click点击商品后跳转到对应的商品列表界面,并传递查询参数
v-for使用问号(?)操作符,即可安全地访问 children 属性。如果 list[activeIndex] 为 undefined(例如,当前没有选中的分类),则不会抛出错误,而是返回 undefined。
1 <div @click ="$router.push(`/searchlist?categoryId=${item.category_id}`)" v-for ="item in list[activeIndex]?.children" :key ="item.category_id" class ="cate-goods" >
api/categorygetCategoryList返回的数据如下
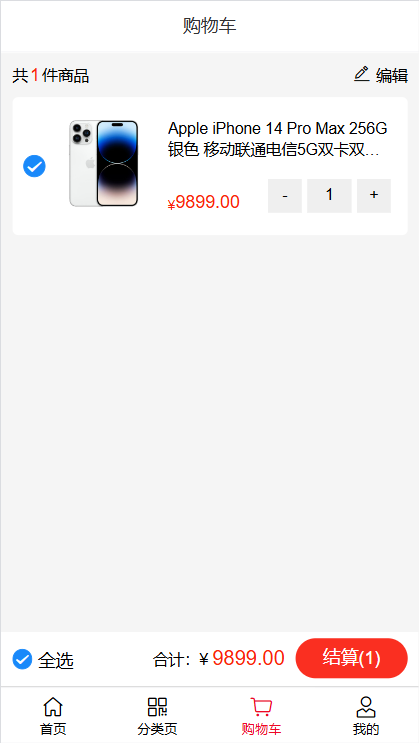
cart 购物车
页面有所选商品,结算
这里要注意当用户没有登录或没有选择商品时,是没有购物车的,应该是一个空白页所以有v-if=isLogin
1 2 3 4 5 6 7 8 9 10 11 12 13 14 15 16 17 18 19 20 21 22 23 24 25 26 27 28 29 30 31 32 33 34 35 36 37 38 39 40 41 42 43 44 45 46 47 48 49 50 51 52 53 54 55 56 57 58 59 60 61 62 63 64 65 66 67 68 69 70 71 72 73 74 75 76 77 78 79 80 81 82 83 84 85 86 87 88 89 90 91 92 93 94 95 96 97 98 99 100 101 102 103 104 105 106 107 108 109 110 111 112 113 114 115 116 117 118 119 120 121 122 123 124 125 126 127 128 129 130 131 132 133 134 135 136 137 138 139 140 141 142 143 144 145 146 147 148 149 150 151 152 153 154 155 156 157 158 159 160 161 162 163 164 165 166 167 168 169 170 171 172 173 174 175 176 177 178 179 180 181 182 183 184 185 186 187 188 189 190 191 192 193 194 195 196 197 198 199 200 201 202 203 204 205 206 207 208 209 210 211 212 213 214 215 216 217 218 219 220 221 222 223 224 225 226 227 228 229 230 231 232 233 234 235 236 237 238 239 240 241 242 243 244 245 246 247 248 249 250 251 252 253 254 255 256 257 258 259 260 261 262 263 264 265 266 267 268 269 270 271 272 273 274 275 276 277 278 279 280 281 282 283 284 285 286 287 288 289 290 291 292 293 294 295 296 <template > <div class ="cart" > <van-nav-bar title ="购物车" fixed /> <div v-if ="isLogin && cartList.length > 0" > <div class ="cart-title" > <span class ="all" > 共<i > {{ cartTotal }}</i > 件商品</span > <span class ="edit" @click ="isEdit = !isEdit" > <van-icon name ="edit" /> 编辑 </span > </div > <div class ="cart-list" > <div class ="cart-item" v-for ="item in cartList" :key ="item.goods_id" > <van-checkbox @click ="toggleCheck(item.goods_id)" :value ="item.isChecked" > </van-checkbox > <div class ="show" > <img :src ="item.goods.goods_image" alt ="" > </div > <div class ="info" > <span class ="tit text-ellipsis-2" > {{ item.goods.goods_name }}</span > <span class ="bottom" > <div class ="price" > ¥ <span > {{ item.goods.goods_price_min }}</span > </div > <CountBox @input ="(value) => changeCount(value, item.goods_id, item.goods_sku_id)" :value ="item.goods_num" > </CountBox > </span > </div > </div > </div > <div class ="footer-fixed" > <div @click ="toggleAllCheck" class ="all-check" > <van-checkbox :value ="isAllChecked" icon-size ="18" > </van-checkbox > 全选 </div > <div class ="all-total" > <div class ="price" > <span > 合计:</span > <span > ¥ <i class ="totalPrice" > {{ selPrice }}</i > </span > </div > <div v-if ="!isEdit" class ="goPay" :class ="{ disabled: selCount === 0 }" @click ="goPay" > 结算({{ selCount }})</div > <div v-else @click ="handleDel" class ="delete" :class ="{ disabled: selCount === 0 }" > 删除</div > </div > </div > </div > <div class ="empty-cart" v-else > <img src ="@/assets/empty.png" alt ="" > <div class ="tips" > 您的购物车是空的, 快去逛逛吧 </div > <div class ="btn" @click ="$router.push('/')" > 去逛逛</div > </div > </div > </template > <script > import CountBox from '@/components/CountBox.vue' import { mapGetters, mapState } from 'vuex' export default { name : 'CartPage' , components : { CountBox }, data () { return { isEdit : false } }, computed : { ...mapState ('cart' , ['cartList' ]), ...mapGetters ('cart' , ['cartTotal' , 'selCartList' , 'selCount' , 'selPrice' , 'isAllChecked' ]), isLogin () { return this .$store .getters .token } }, created () { if (this .isLogin ) { this .$store .dispatch ('cart/getCartAction' ) } }, methods : { toggleCheck (goodsId) { this .$store .commit ('cart/toggleCheck' , goodsId) }, toggleAllCheck () { this .$store .commit ('cart/toggleAllCheck' , !this .isAllChecked ) }, changeCount (goodsNum, goodsId, goodsSkuId) { this .$store .dispatch ('cart/changeCountAction' , { goodsNum, goodsId, goodsSkuId }) }, async handleDel () { if (this .selCount === 0 ) return await this .$store .dispatch ('cart/delSelect' ) this .isEdit = false }, goPay () { if (this .selCount > 0 ) { this .$router .push ({ path : '/pay' , query : { mode : 'cart' , cartIds : this .selCartList .map (item =>id ).join (',' ) } }) } } }, watch : { isEdit (value) { if (value) { this .$store .commit ('cart/toggleAllCheck' , false ) } else { this .$store .commit ('cart/toggleAllCheck' , true ) } } } } </script > <style lang ="less" scoped > // 主题 padding .cart { padding-top : 46px ; padding-bottom : 100px ; background-color : #f5f5f5 ; min-height : 100vh ; .cart-title { height : 40px ; display : flex; justify-content : space-between; align-items : center; padding : 0 10px ; font-size : 14px ; .all { i { font-style : normal; margin : 0 2px ; color : #fa2209 ; font-size : 16px ; } } .edit { .van-icon { font-size : 18px ; } } } .cart-item { margin : 0 10px 10px 10px ; padding : 10px ; display : flex; justify-content : space-between; background-color : #ffffff ; border-radius : 5px ; .show img { width : 100px ; height : 100px ; } .info { width : 210px ; padding : 10px 5px ; font-size : 14px ; display : flex; flex-direction : column; justify-content : space-between; .bottom { display : flex; justify-content : space-between; .price { display : flex; align-items : flex-end; color : #fa2209 ; font-size : 12px ; span { font-size : 16px ; } } .count-box { display : flex; width : 110px ; .add , .minus { width : 30px ; height : 30px ; outline : none; border : none; } .inp { width : 40px ; height : 30px ; outline : none; border : none; background-color : #efefef ; text-align : center; margin : 0 5px ; } } } } } } .footer-fixed { position : fixed; left : 0 ; bottom : 50px ; height : 50px ; width : 100% ; border-bottom : 1px solid #ccc ; background-color : #fff ; display : flex; justify-content : space-between; align-items : center; padding : 0 10px ; .all-check { display : flex; align-items : center; .van-checkbox { margin-right : 5px ; } } .all-total { display : flex; line-height : 36px ; .price { font-size : 14px ; margin-right : 10px ; .totalPrice { color : #fa2209 ; font-size : 18px ; font-style : normal; } } .goPay , .delete { min-width : 100px ; height : 36px ; line-height : 36px ; text-align : center; background-color : #fa2f21 ; color : #fff ; border-radius : 18px ; &.disabled { background-color : #ff9779 ; } } } } .empty-cart { padding : 80px 30px ; img { width : 140px ; height : 92px ; display : block; margin : 0 auto; } .tips { text-align : center; color : #666 ; margin : 30px ; } .btn { width : 110px ; height : 32px ; line-height : 32px ; text-align : center; background-color : #fa2c20 ; border-radius : 16px ; color : #fff ; display : block; margin : 0 auto; } } </style >
当没有点击编辑时,时结算页面,
否则是删除页面
1 2 <div v-if ="!isEdit" class ="goPay" :class ="{ disabled: selCount === 0 }" @click ="goPay" > 结算({{ selCount }})</div > <div v-else @click ="handleDel" class ="delete" :class ="{ disabled: selCount === 0 }" > 删除</div >
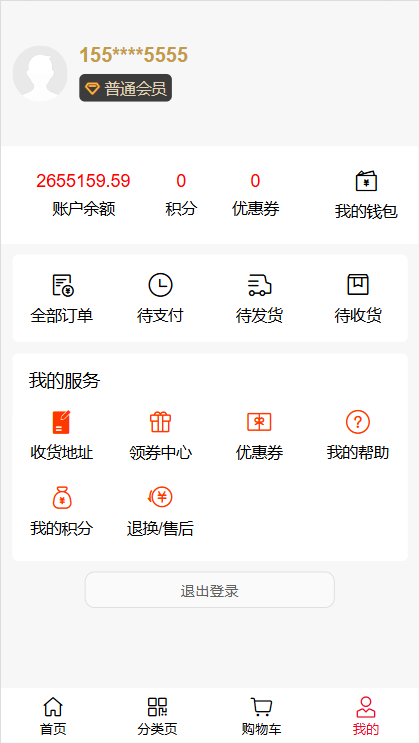
user 个人中心
页面里面实现查看订单以及退出登录的功能
个人中心这里面很多东西都是写死的
1 2 3 4 5 6 7 8 9 10 11 12 13 14 15 16 17 18 19 20 21 22 23 24 25 26 27 28 29 30 31 32 33 34 35 36 37 38 39 ``` ### login 登录及注册界面 实现登录和注册功能  ### order 订单界面 实现下单功能  ### pay 支付页面 实现支付功能  ### productDetail 商品详情页面 实现商品简介轮播图,评价,商品详情介绍 ### search 搜索页面 实现商品搜索功能,以及保留商品搜索历史(不会随着浏览器刷新而消失) ## 功能实现 主要实现功能流程如下图 ![]() ### 搜索功能 **将搜索记录保存在本地** 在`storage.js`里面 JSON.parse()将字符串解析成为JS对象 JSON.stringify()将数组转换为字符串类型
// 搜索,将搜索记录保存到localstorage中的键名 history_list里面
// 获取搜索历史
// 设置搜索历史
1 2 3 4 5 6 7 8 9 10 11 **实现搜索跳转功能** 通过goSearch 函数, 将输入框的值key传到indexOf(JS数组实现方法:找到该元素返回该元素的索引,没有返回-1) 如果没有找到该商品,使用splice方法删除数组中`index`开始位置的`1`个元素 使用unshfit方法将刚才搜索过的key放到历史搜索记录的首位(因为可能没有该商品,但是应该保留搜索记录) 将该搜索记录保存到本地 跳转路由到searchlist页面,?search=${key} 传参(查询参数)
goSearch (key) {/searchlist?search=${key})
1 2 **清除搜索历史** 清除本地的搜索历史,并弹出提示
clear () {
1 2 3 4 5 6 7 8 9 10 11 **搜索结果页面** querySearch 获取查询参数 async created 异步获取商品列表信息 从路由中获取categoryId (搜索进入和从商品分类页进入不一样) 从商品的api中获取商品信息并渲染 在`api/product.js`里面调用getProductList函数
// 获取商品列表数据
computed: {