Java 面向对象编程 面向对象(OOP)与面向过程(POP)的区别 面向过程就是按照过程自己 一步一步完成编程来解决问题
面向对象就是创建对象,让对象来解决问题
举个栗子:
解决做饭的问题:
面向过程:买菜 =》做饭 (自己在干活)
面向对象:让厨师做饭
类与对象 类是把具体的实物抽象成一个模板,类中有成员变量,成员方法
对象是类的具体化,每个对象都有所不同
栗子:
类: 人类
对象: 妈妈
1
2
3
4
5
6
7
8
9
10
11
12
13
14
15
16
public class Student { String name; int age; public void study () { System.out.println("study!!!" ); } } public class text { public static void main (String[] args) { Student stu = new Student (); stu.name = "南马" ; stu.age = 66 ; stu.study(); } }
对象的内存图 运行程序时,在main方法(在堆区)里面定义一个对象时,该对象的类就会加载到方法区(元数据区),然后将该成员变量放到堆区,成员方法在堆区会有一个地址的索引(方法在方法区的入口地址)
堆区是用来存储对象实例的地方。当使用new创建对象时,对象的实例数据(成员变量会分配到堆区
栈区是用来存储局部变量,方法调用的参数和返回值
不论是创建一个对象,还是多个对象,类只会在方法区加载一次,每个对象会在堆内存有自己的内存空间,它们共用同一个方法区的信息
两个引用指向同一个对象
1
2
3
4
5
6
7
8
9
10
11
12
public class text { public static void main (String[] args) { Student stu = new Student (); stu.name = "南马" ; stu.age = 66 ; stu.study(); Student stu2 = stu; stu2.name = "SB" ; System.out.println(stu.name) System.out.println(stu2.name) } }
因为Student stu2 = stu;相当于stu把它堆内存的的地址赋值给了stu2,之后stu2改变其name,其实是改变stu的name,因为它都指向同一块堆内存
其实很好理解当创建对象使用new时是在堆区创建一块栈内存,当Student stu2 = stu;相当于两个对象共用一块堆内存
垃圾回收机制
在堆内存中,对象或数组产生的地址,通过任何方式都不能找到时,就会判定为垃圾 ,被Java垃圾回收器空闲时自动进行清理
成员变量和局部变量 1 2 3 4 5 6 7 8 public class Student { String name; int age; public void study () { String hello = "Hello" ; System.out.println("study!!!" ); } }
成员变量
1.位置:类中方法外
2.内存位置:堆内存
3.生命周期:与对象的生命周期一样
4.初始化值:有默认的初始化值
局部变量
1.位置:方法内
2.内存位置:栈内存
3.生命周期:与方法的生命周期一样
4.初始化值:没有默认的初始化值,必须先定义,赋值,才能使用
三大特性 封装 隐藏实现细节,仅对外暴露公共访问的方式(类似与API)
栗子:汽车将各种需要人工操作的地方封装成一个个按钮,供人们使用,不用展示实现细节
使用private关键字,被private修饰的成员只能在本类中使用
this代表所在类的对象的地址
1 2 3 4 5 6 7 8 9 10 11 12 13 14 15 16 17 18 19 20 21 22 23 24 25 26 27 28 public class Student { String name; private int age; public void setAge (int age) { if (a>0 && a<=150 ){ this .age = age; } else { System.out.printf("SB" ); } } public int getAge () { return age; } public void study () { System.out.println("study!!!" ); } } public class text { public static void main (String[] args) { Student stu = new Student (); stu.name = "南马" ; stu.setAge(66 ); System.out.println(stu.getAge()); stu.study(); } }
构造方法 在创建对象时执行Student stu = new Student();,每创建一个对象执行一次
给对象的数据(属性)进行初始化
1 2 3 4 5 6 7 8 public class Student { String name; private int age; public Student (String name, int age) { this .name = name; this .age = age; } }
如果想要实现创建对象时就初始化 和仅仅创建对象而不初始化 两种情况同时发生,类应该将无参构造方法和有参构造方法全写上
1 2 3 4 5 6 7 8 9 10 11 12 13 14 15 public class Student { String name; private int age; public Student (String name, int age) { this .name = name; this .age = age; } public Student () {} } public class text { public static void main (String[] args) { Student stu = new Student (); Student stu2 = new Student (SB, 66 ); } }
继承 继承只能单继承,不能多继承(C++可以),但支持多层继承
super与this的用法相似,代表使用父类的变量和方法(this是使用本类的变量和方法)
1 2 3 4 5 6 7 8 9 10 11 12 13 14 15 16 17 18 19 20 21 22 23 24 25 26 27 28 29 30 31 32 //父类 public class farther { String name = "小头爸爸"; int age; public void show() { System.out.println("父类成员方法"); } } //子类 public class son extends farther { String name = "大头儿子"; int age; public void hh() { String name = "123456"; //123456 System.out.println(name); //大头儿子 System.out.println(this.name); //小头爸爸 System.out.println(super.name); //子类成员方法 this.show(); //父类成员方法 super.show(); } public void show() { System.out.println("子类成员方法"); } }
方法重写
使用场景:当需要使用父类继承的方法,但还需要多添加一些内容在该方法时
1 2 3 4 5 6 7 8 9 10 11 12 13 14 //父类 public class farther { public void show() { System.out.println("Speak English"); } } //子类 public class son extends farther { public void show() { super.show(); System.out.println("讲中文"); } }
这里需要注意方法重写 和方法重载 不一样
前者是方法完全相同(方法名,参数列表,返回值)
后者是方法名相同,其他不同
父类是静态方法(static),子类必须通过静态方法进行重写,反之一样
子类重写父类方法时,访问权限(public, protected, private )必须大于等于父类
子类中所有的默认方法都会访问父类的无参构造方法进行初始化(使用super(),构造方法的第一句默认都是super();)
抽象类 抽象类不允许实例化
是将共性的问题抽象到父类,但是在父类中描述不清
如果一个类中存在抽象方法,那么这个类也要写成抽象类
1 2 3 public abstract class farther { public abstract void show(); }
抽象类的子类必须重写父类的全部抽象方法,子类正常写抽象方法(不用加abstract)
1 2 3 4 5 public class son extends farther { public void show() { System.out.println("123"); } }
final 关键字
指最终的,无法修改 使用这个关键字,在使用模板时,子类无法修改模板,避免了一些不必要的错误
final修饰方法,表示该方法不能被重写
final修饰变量,表示该变量只能赋值一次
final修饰类,表示该类不能被继承
多态 同一个对象在不同时刻表示出来不同状态
1 2 3 4 5 6 7 Animal a = new Cat ();Cat c = new Cat ();
多态的好处:
定义通用的方法,相当于模板,子类继承父类只需要重写方法即可
提高了代码的复用性和扩展性
1 2 3 4 5 6 7 8 9 10 11 12 13 14 15 16 17 18 19 20 21 22 23 24 25 26 27 28 29 30 31 public class text { public static void main (String[] args) { Animal dog = new dog (); Animal cat = new cat (); eat(dog); eat(cat); } public static void eat (Animal animal) { animal.eat(); } } abstract class Animal { public abstract void eat () ; } class dog extends Animal { @Override public void eat () { System.out.println("dog eat" ); } } class cat extends Animal { @Override public void eat () { System.out.println("cat eat" ); } }
内部类 成员内部类 类内部的类
1 2 3 4 5 6 7 8 9 10 11 12 13 14 15 16 17 18 19 20 public class text2 { public static void main (String[] args) { outer.inner i = new outer ().new inner (); i.show(); } } class outer { int b = 99 ; public void say () { System.out.println("say Hi!" ); } class inner { int a = 10 ; public void show () { System.out.println(a); say(); } } }
定义在类内但不在方法内
可以被修饰符所修饰 private (私有成员内部类)
1 2 3 4 5 6 7 8 9 10 11 12 13 14 15 16 17 18 public class text3 { public static void main (String[] args) { out o = new out (); o.method(); } } class out { private class inner { public void show () { System.out.println("inner show" ); } } public void method () { inner i = new inner (); i.show(); } }
静态内部类 对于static关键字,外部类名.内部类名 对象名 = new 外部类名.内部类名();
1 2 3 4 5 6 7 8 9 10 11 12 13 14 public class text3 { public static void main (String[] args) { out.inner i = new out .inner(); i.show(); } } class out { static class inner { public void show () { System.out.println("inner show" ); } } }
局部内部类 在方法中定义的类,在外界无法使用,需要在方法内部创建对象使用,该类可以直接访问外部类,方法里面的局部变量
1 2 3 4 5 6 7 8 9 10 11 12 13 14 15 16 17 18 public class text3 { public static void main (String[] args) { out o = new out (); o.method(); } } class out { public void method () { class inner { public void show () { System.out.println("inner show" ); } } inner i = new inner (); i.show(); } }
匿名内部类 匿名内部类是将(继承\实现),(方法重写),(创建对象),写到了一步
1 2 3 4 5 6 7 8 9 10 11 12 13 public class text5 { public static void main (String[] args) { new Inter1 () { public void say () { System.out.println("say" ); } }.say(); } } interface Inter1 { public void say () ; }
当需要调用两个及以上的匿名内部类方法时,写法如下:
1 2 3 4 5 6 7 8 9 10 11 12 13 14 15 16 17 18 19 public class text5 { public static void main (String[] args) { Inter1 i = new Inter1 () { public void say () { System.out.println("say" ); } public void eat () { System.out.println("eat" ); } }; i.say(); i.eat(); } } interface Inter1 { public void say () ; public void eat () ; }
API 接口 当一个类中的所有方法都是抽象方法,可以定义为接口,接口的实现和类的继承不一样,接口可以多实现,而继承不可以多继承
接口使用interface来定义
接口和类之间是实现关系,使用implements关键字
接口的子类要么重写接口的所有抽象方法《eg:1》,要么是抽象类(这个类就不能实例化<抽象类不能实例化>)《eg:2》
eg1:
1 2 3 4 5 6 7 8 9 10 11 12 13 14 15 16 17 18 19 20 21 22 23 24 25 26 27 28 29 30 31 32 33 34 public class text4 { public static void main (String[] args) { me m = new me (); m.eat(); m.say(); m.buy(); } } interface Person { public void say () ; public void eat () ; } interface something { public void buy () ; } class me implements Person , something{ @Override public void say () { System.out.println("Hello" ); } @Override public void eat () { System.out.println("eat" ); } @Override public void buy () { System.out.println("buy something" ); } }
eg2:
1 2 3 4 5 6 7 8 9 10 11 12 13 14 15 16 17 18 19 20 21 22 23 24 25 26 27 28 29 30 31 32 33 34 35 36 37 38 39 40 41 42 43 public class text4 { public static void main (String[] args) { people p = new people (); p.eat(); p.say(); p.buy(); p.give(); } } interface Person { public void say () ; public void eat () ; } interface something { public void buy () ; public void give () ; } abstract class me implements Person , something{ @Override public void say () { System.out.println("Hello" ); } @Override public void eat () { System.out.println("eat" ); } @Override public void buy () { System.out.println("buy something" ); } } class people extends me { @Override public void give () { System.out.println("give something" ); } }
接口中的成员特点: 接口和接口之间是继承关系,接口和类之间是实现关系
注意 这里接口和接口之间可以多继承,与类与类的继承不一样
成员变量
成员变量是常量,被public static final 关键字所修饰
构造方法
没有
成员方法
被public abstract 关键字所修饰
JDK8的新特性
允许在接口中定义非抽象方法关键字,但必须使用default,就是默认方法
格式: public default 返回值类型 方法名 (){}
允许在接口定义静态方法,使用关键字static,格式与非抽象方法一样
JDK9的新特性
允许使用private私有权限
注意事项
1.该方法是默认方法,在类内可以不写,也可以重写方法,在子类重写的时候需要去掉default
2.public可以省略,default不可以省略
3.如果子类实现的接口里面有相同的默认方法名,则子类中需要重写该方法
4.静态方法只能通过接口名来调用(interface InnterA{} InnterA.show();),
不能实现类名(class people implements InnterA{} people.show() )或对象名调用(people i = new people(); i.show();)
5.public可以省略,static不可以省略
集合 1.集合的长度可以改变,根据需要动态添加或删除
2.集合使用泛型
1 2 3 ArrayList list1 = new ArrayList(); //限定存储的数据类型 ArrayList<String> list2 = new ArrayList<>();
这里要注意<>里面需要写引用数据类型
引用数据类型
不同于基本数据类型(int,double,boolen)
存储在堆内存
常见的引用数据类型:
对象(Object),数组(Array),字符串(String),集合(Collection)
Lambda表达式 使用前提 :接口中只有一个抽象方法
形式参数的参数类型可以省略
1 2 3 4 5 6 7 8 9 10 11 12 13 14 15 public class text5 { public static void main (String[] args) { useCalculator((a, b) -> { return a+b; }); } public static void useCalculator (Calculator calculator) { int result = calculator.calc(10 , 20 ); System.out.println(result); } } interface Calculator { public int calc (int a, int b) ; }
lambda表达式其实就是对接口方法的重写
1 (a, b) -> { return a+b;}
与JS的箭头函数有点像,但不一样
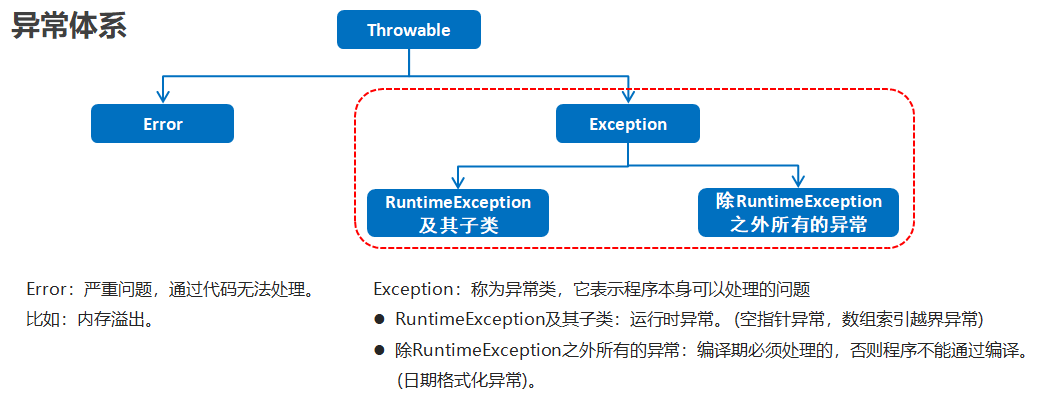
异常
编译时异常
都是Exception类及其子类
throws方式处理异常 1 public void 方法名() throws 异常类名 {}
处理编译时异常必须显式声明。将来会抛出这个异常(不会处理)
运行时异常因为在运行时才会发生,所以不用显示声明,运行时出现的异常默认交给jvm处理
1 2 3 4 5 6 7 8 9 10 11 12 13 14 15 16 17 18 19 public class text7 { public static void main (String[] args) throws ParseException { System.out.println("开始" ); method2(); System.out.println("结束" ); } public static void method () throws ArrayIndexOutOfBoundsException { int [] arr = {1 , 2 , 3 }; System.out.println(arr[3 ]); } public static void method2 () throws ParseException { String s = "2048-08-09" ; SimpleDateFormat sdf = new SimpleDateFormat ("yyyy年MM-dd" ); Date d = sdf.parse(s); System.out.println(d); } }
throw 抛出异常 throw 是写在方法内,后面跟着异常对象名,相当于代码手动抛出异常,下面的代码不再运行
throws是写在方法声明之后,后面跟着异常类名
1 2 3 4 5 6 7 8 9 10 11 12 13 14 15 public static void main (String[] args) { int [] arr = {1 , 2 , 3 , 4 , 5 , 6 }; int [] arrs = null ; printarr(arr); printarr(arrs); } public static void printarr (int [] arr) { if (arr == null ) { throw new NullPointerException (); } else { for (int i = 0 ; i<arr.length ; i++) { System.out.println(arr[i]); } } }
try-catch 方式处理异常 1 2 3 4 5 try{ //可能出现异常的代码 } catch(异常类名 变量名) { //异常处理的代码 }
执行机制:
执行try 里面的代码 -> 当出现异常,跳转到catch里面去执行 -> 继续执行下面的代码
1 2 3 4 5 6 7 8 9 10 11 12 13 14 15 public static void main (String[] args) { System.out.println("start" ); method(); System.out.println("end" ); } public static void method () { try { int [] arr = {1 , 2 , 3 }; System.out.println(arr[3 ]); System.out.println("已经执行异常后的代码" ); } catch (ArrayIndexOutOfBoundsException e) { System.out.println("数组检索越界" ); } }
如果同时需要处理多个异常,写多个catch就行
注意:catch多个异常时,子异常需要写在父异常上面(因为父异常会捕获,子异常就无法捕获了)
自定义异常 自定义异常类 需要 定义异常类-> 写继承关系 -> 空参构造 -> 带参构造
1 2 3 4 5 6 7 public class StudentAgeOutArray extends RuntimeException { public StudentAgeOutArray () { } public StudentAgeOutArray (String message) { super (message); } }
1 2 3 4 5 6 7 8 9 10 11 12 13 14 15 16 17 18 19 20 21 22 23 24 25 26 27 28 29 30 31 32 public class StudentAgeOutArray extends RuntimeException { public StudentAgeOutArray () { } public StudentAgeOutArray (String message) { super (message); } } public class text10 { public static void main (String[] args) { student s = new student (); Scanner sc = new Scanner (System.in); System.out.println("输入年龄:" ); try { s.setAge(sc.nextInt()); } catch (StudentAgeOutArray e) { System.out.println(e.toString()); System.out.println("---------学生年龄超出范围" ); } } } class student { int age; public void setAge (int age) { if (age >= 18 && age<=25 ){ this .age = age; } else { throw new StudentAgeOutArray ("年龄超出了范围" ); } } }
泛型 泛型就是通用的意思, 可以定义一个广泛的类型,相当于一个模板,基本数据类型包装类(Integer, String)可以套用
1 2 3 4 5 6 7 8 9 10 11 12 13 14 15 16 17 public class text11 { public static void main (String[] args) { Person<Integer> people = new Person <>(); System.out.println(people.method(18 )); Person<String> people2 = new Person <>(); System.out.println(people2.method("哈哈哈" )); Person<Boolean> people3 = new Person <>(); System.out.println(people3.method(true )); } } class Person <T> { public T method (T t) { return t; } }
泛型方法 1 修饰符 <类型> 返回值类型 方法名(类型 变量名) {}
1 2 3 4 5 6 7 8 9 10 11 12 13 14 public class text12 { public static void main (String[] args) { hhh h = new hhh (); h.show("哈哈哈" ); h.show(true ); h.show(666 ); } } class hhh { public <T> void show (T t) { System.out.println(t); } }
泛型接口 1 修饰符 interface 接口名<类型> {}
写泛型接口的实现类时,有两种:
一种是定义实现类和接口相同的泛型,在创建对象时在具体泛型的类型
一种是定义实现类时直接明确泛型的具体类型
1 2 3 4 5 6 7 8 9 10 11 12 13 14 15 16 17 18 19 20 21 22 23 24 25 26 27 28 public class text13 { public static void main (String[] args) { lll1<String> l1 = new lll1 <>(); l1.show("String" ); lll1<Integer> l2 = new lll1 <>(); l2.show(666 ); lll2 l3 = new lll2 (); l3.show(999 ); } } interface lll <T> { void show (T t) ; } class lll1 <T> implements lll <T> { @Override public void show (T t) { System.out.println(t); } } class lll2 implements lll <Integer> { @Override public void show (Integer i) { System.out.println(i); } }
类通配符 1 <?> <? extends 类型> <? super 类型>
类型通配符上限: <? extends 类型>
ArrayListList <? extends Number>: 它表示的类型是Number或者其子类型
类型通配符下限: <? super 类型>
ArrayListList <? super Number>: 它表示的类型是Number或者其父类型
1 2 3 4 5 6 7 8 9 10 11 12 13 14 15 16 17 18 19 20 21 22 23 24 25 26 27 28 29 public class text14 { public static void main (String[] args) { ArrayList<Integer> list1 = new ArrayList <>(); ArrayList<String> list2 = new ArrayList <>(); ArrayList<Number> list3 = new ArrayList <>(); ArrayList<Object> list4 = new ArrayList <>(); method1(list1); method1(list2); method1(list3); method1(list4); method2(list1); method2(list2); method2(list3); method2(list4); method3(list1); method3(list2); method3(list3); method3(list4); } public static void method1 (ArrayList<?> a) {} public static void method2 (ArrayList<? extends Number> a) {} public static void method3 (ArrayList<? super Number> a) {} }
Stream流 Stream流的三类方法
获取Stream流
中间方法
流水线上的操作
一次操作完毕之后,还可以继续进行其他操作
终结方法
一个Stream流只能有一个终结方法
是流水线上的最后一个操作
生成Stream流
1 2 3 4 5 6 7 8 9 public static void main (String[] args) { ArrayList<String> list = new ArrayList <>(); list.add("aaa" ); list.add("bbb" ); list.add("ccc" ); Stream<String> listStream = list.stream(); listStream.forEach(s -> System.out.println(s)); list.stream().forEach(s -> System.out.println(s)); }
1 2 3 4 5 6 7 8 public static void main (String[] args) { HashMap<String, Integer> map = new HashMap <>(); map.put("哈哈哈" , 666 ); map.put("呜呜呜" , 555 ); map.put("哇哇哇" , 999 ); map.keySet().stream().forEach(s -> System.out.println(s)); map.entrySet().stream().forEach(s -> System.out.println(s)); }
1 2 3 4 public static void main (String[] args) { int [] arr = {1 , 2 , 3 }; Arrays.stream(arr).forEach(s -> System.out.println(s)); }
1 2 3 public static void main (String[] args) { Stream.of(1 , 2 , 3 , 4 , 5 , 6 ).forEach(s -> System.out.println(s)); }
Stream流中间操作方法
方法名
说明
Stream filter(Predicate predicate)
用于对流中的数据进行过滤
Stream limit(long maxSize)
返回此流中的元素组成的流,截取前指定参数个数的数据
Stream skip(long n)
跳过指定参数个数的数据,返回由该流的剩余元素组成的流
static Stream concat(Stream a, Stream b)
合并a和b两个流为一个流
Stream distinct()
返回由该流的不同元素(根据Object.equals(Object) )组成的流(除去重复的元素)
终结流的操作方法
方法名
说明
void forEach(Consumer action)
对此流的每个元素执行操作
long count()
返回此流中的元素数
File IO流 多线程 并发和并行
并发:同一时刻,多个指令在一个CPU上执行(将时刻细分成小段,每个小段处理一个指令,不是同时处理指令)
并行:同一时刻,多个指令在多个CPU上执行(同时处理指令)
线程和进程
进程相当于运行一个程序,线程是这个程序的一条执行路径(一个功能)
Thread
Thread是实现多线程的一种类
Runnable
Runnable是一个函数式接口,用于执行一个任务,可以交给进程来执行
FutureTask
一个异步计算的类
实现多线程方式一:继承Thread类
方法名
说明
void run()
在线程开启后,此方法将被调用执行
void start()
使此线程开始执行,Java虚拟机会调用run方法()
run方法是启动该线程
start是启动一个新线程,然后新线程与调用线程并发执行(当一个线程通过调用 start() 方法来启动另一个线程时,发起启动的线程称为调用线程。)
1 2 3 4 5 6 7 8 9 10 11 12 13 14 15 16 public class myTread extends Thread { @Override public void run () { for (int i = 0 ; i < 10 ; i++) { System.out.println(i); } } } public static void main (String[] args) { myTread m1 = new myTread (); myTread m2 = new myTread (); m1.start(); m2.start(); }
实现多线程方式二:实现Runnable接口
方法名
说明
Thread(Runnable target)
分配一个新的Thread对象
Thread(Runnable target, String name)
分配一个新的Thread对象
1 2 3 4 5 6 7 8 9 10 11 12 13 14 15 16 17 18 19 20 public class myRunnable extends Thread { @Override public void run () { for (int i = 0 ; i < 10 ; i++) { System.out.println(i); } } } public static void main (String[] args) { myRunnable m1 = new myRunnable (); Thread t1 = new Thread (m1); Thread t2 = new Thread (m1); Thread t3 = new Thread (m1, "hhh" ); Thread t4 = new Thread (m1, "kkk" ); t1.start(); t2.start(); t3.start(); t4.start(); }
实现多线程方式三:实现Callable接口
方法名
说明
V call()
计算结果,如果无法计算结果,则抛出一个异常
FutureTask(Callable callable)
创建一个 FutureTask,一旦运行就执行给定的 Callable
V get()
如有必要,等待计算完成,然后获取其结果
进程结束之后有返回值
1 2 3 4 5 6 7 8 9 10 11 12 13 14 15 16 17 18 19 public class myCallable implements Callable <String> { @Override public String call () throws Exception { for (int i = 0 ; i < 10 ; i++) { System.out.println("study" + i); } return "dead" ; } } public static void main (String[] args) throws ExecutionException, InterruptedException { myCallable m1 = new myCallable (); FutureTask<String> ft = new FutureTask <>(m1); Thread t1 = new Thread (ft); t1.start(); String s = ft.get(); System.out.println(s); }
三种方式的对比
实现Runnable、Callable接口
好处: 扩展性强,实现该接口的同时还可以继承其他的类
缺点: 编程相对复杂,不能直接使用Thread类中的方法
继承Thread类
好处: 编程比较简单,可以直接使用Thread类中的方法
缺点: 可以扩展性较差,不能再继承其他的类
设置和获取线程名称
方法名
说明
void setName(String name)
将此线程的名称更改为等于参数name
Thread currentThread()
返回对当前正在执行的线程对象的引用
String getName()
返回此线程的名称
Thread.currentThread().getName()这样来使用
线程休眠
方法名
说明
static void sleep(long millis)
使当前正在执行的线程停留(暂停执行)指定的毫秒数
1 2 3 4 5 6 7 8 9 10 11 12 13 14 15 16 17 18 19 20 21 22 23 24 25 26 27 28 public class myRunnable implements Runnable { @Override public void run () { for (int i = 0 ; i < 100 ; i++) { try { Thread.sleep(100 ); } catch ( InterruptedException e) { e.printStackTrace(); } System.out.println(Thread.currentThread().getName() + " : " + i); } } } public static void main (String[] args) throws InterruptedException { System.out.println("睡觉前" ); Thread.sleep(3000 ); System.out.println("睡醒了" ); myRunnable m1 = new myRunnable (); Thread t1 = new Thread (m1); Thread t2 = new Thread (m1); t1.start(); t2.start(); }
线程的优先级 线程调度
分时调度模型:所有线程轮流使用 CPU 的使用权,平均分配每个线程占用 CPU 的时间片
抢占式调度模型:优先让优先级高的线程使用 CPU,如果线程的优先级相同,那么会随机选择一个,优先级高的线程获取的 CPU 时间片相对多一些(并不会先执行优先级大的,然后才执行优先级小的)
java使用的是抢占式调度模型。
方法名
说明
final int getPriority()
返回此线程的优先级
final void setPriority(int newPriority)
更改此线程的优先级线程默认优先级是5;线程优先级的范围是:1-10
1 2 3 4 5 6 7 8 9 10 11 12 13 14 15 16 17 18 19 20 21 22 23 24 25 26 public class myCallable implements Callable <String> { @Override public String call () throws Exception { for (int i = 0 ; i < 10 ; i++) { System.out.println("study" + i); } return "dead" ; } } public static void main (String[] args) { myCallable m1 = new myCallable (); FutureTask ft = new FutureTask <>(m1); Thread t1 = new Thread (ft); t1.setName("飞机" ); t1.setPriority(10 ); System.out.println("***" + t1.getPriority()); t1.start(); myCallable m2 = new myCallable (); FutureTask ft2 = new FutureTask <>(m2); Thread t2 = new Thread (ft2); t2.setName("坦克" ); t2.setPriority(1 ); System.out.println("***" + t2.getPriority()); t2.start(); }
守护线程
方法名
说明
void setDaemon(boolean on)
将此线程标记为守护线程,当运行的线程都是守护线程时(没有用户线程了),Java虚拟机将退出
用户线程
用户线程(User Thread)是指在 Java 中由用户程序直接创建并管理的线程。
当 Java 应用程序中的所有用户线程结束时,守护线程会自动退出。也就是说,只要没有用户线程在运行,Java 虚拟机(JVM)就会终止守护线程。
那为什么在用户线程结束之后,守护线程还会运行一点点?
尽管 t2 设置为守护线程,但它依然可能在用户线程 t1 完成后,继续执行其运行中的任务。守护线程会被 JVM 强制终止,但在调用 t1 的 join() 方法之前,守护线程可能已经得到了 CPU 时间片,从而输出了更多的日志。
由于线程的调度是异步的,某些情况下,守护线程可能在最后一刻获得执行权,并在用户线程t1结束后继续执行几次输出。
1 2 3 4 5 6 7 8 9 10 11 12 13 14 15 16 17 18 19 20 21 22 23 24 25 26 27 28 public class myTread extends Thread { @Override public void run () { for (int i = 0 ; i < 10 ; i++) { System.out.println(getName() + "---" + i); } } } public class myThread2 extends Thread { @Override public void run () { for (int i = 0 ; i < 100 ; i++) { System.out.println(getName() + "---" + i); } } } public static void main (String[] args) { myTread t1 = new myTread (); myThread2 t2 = new myThread2 (); t1.setName("用户线程" ); t2.setName("守护线程" ); t2.setDaemon(true ); t1.start(); t2.start(); }
线程同步 多个线程同时访问共享资源
多线程数据安全
把操作共享的数据锁起来,在任意时刻只能有一个线程执行即可
同步代码块:
synchronized的锁对象必须是唯一的,要不然每个线程都有对应的锁就无法实现任意时刻只有一个线程访问共享数据
1 2 3 synchronized(任意对象) { 多条语句操作共享数据代码 }
1 2 3 4 5 6 7 8 9 10 11 12 13 14 15 16 17 18 19 20 21 22 23 24 25 26 27 28 29 30 31 32 33 34 35 36 37 38 39 public class ticket implements Runnable { private int ticket = 100 ; Object obj = new Object (); @Override public void run () { while (true ) { synchronized (obj) { if (ticket <= 0 ) { break ; } else { try { Thread.sleep(100 ); } catch (InterruptedException e) { throw new RuntimeException (e); } ticket--; System.out.println("在" + Thread.currentThread().getName() +"还剩" + ticket + "张票" ); } } } } } public static void main (String[] args) { ticket t1 = new ticket (); Thread th1 = new Thread (t1); Thread th2 = new Thread (t1); Thread th3 = new Thread (t1); th1.setName("窗口一" ); th2.setName("窗口二" ); th3.setName("窗口三" ); th1.start(); th2.start(); th3.start(); }
Lock锁 虽然我们可以理解同步代码块和同步方法的锁对象问题,但是我们并没有直接看到在哪里加上了锁,在哪里释放了锁,为了更清晰的表达如何加锁和释放锁,JDK5以后提供了一个新的锁对象Lock
Lock是接口不能直接实例化,这里采用它的实现类ReentrantLock来实例化
ReentrantLock构造方法
方法名
说明
ReentrantLock()
创建一个ReentrantLock的实例
加锁解锁方法
方法名
说明
void lock()
获得锁
void unlock()
释放锁
死锁 多个线程相互持有对方所需要的资源,导致这些线程处于等待状态,无法继续执行
发生死锁的情况
资源有限,同步嵌套
生产者 消费者 生产者消费者模式是一个十分经典的多线程协作的模式,弄懂生产者消费者问题能够让我们对多线程编程的理解更加深刻。
所谓生产者消费者问题,实际上主要是包含了两类线程:
一类是生产者线程用于生产数据
一类是消费者线程用于消费数据
为了解耦生产者和消费者的关系,通常会采用共享的数据区域,就像是一个仓库
生产者生产数据之后直接放置在共享数据区中,并不需要关心消费者的行为
消费者只需要从共享数据区中去获取数据,并不需要关心生产者的行为
方法名
说明
void wait()
导致当前线程等待,直到另一个线程调用该对象的 notify()方法或 notifyAll()方法
void notify()
唤醒正在等待对象监视器的单个线程
void notifyAll()
唤醒正在等待对象监视器的所有线程
1 2 3 4 5 6 7 8 9 10 11 12 13 14 15 16 17 18 19 20 21 22 23 24 25 26 27 28 29 30 31 32 33 34 35 36 37 38 39 40 41 42 43 44 45 46 47 48 49 50 51 52 53 54 55 56 57 58 59 60 61 public class desk { public static boolean flag = false ; public static int count = 10 ; public static final Object lock = new Object (); } public class Cooker extends Thread { @Override public void run () { while (true ) { synchronized (desk.lock) { if (desk.count == 0 ) { break ; } else { if (!desk.flag) { System.out.println("Cooker正在制作食物" + (11 - desk.count)); desk.flag = true ; desk.lock.notifyAll(); } else { try { desk.lock.wait(); } catch (InterruptedException e) { throw new RuntimeException (e); } } } } } } } public class Eater extends Thread { @Override public void run () { while (true ) { synchronized (desk.lock) { if (desk.count == 0 ) { break ; } else { if (desk.flag) { System.out.println("顾客在品尝食物" ); desk.flag = false ; desk.count--; desk.lock.notifyAll(); } else { try { desk.lock.wait(); } catch (InterruptedException e) { throw new RuntimeException (e); } } } } } } } public static void main (String[] args) { Cooker c = new Cooker (); Eater e = new Eater (); c.start(); e.start(); }
优化后的代码:面向对象
在类中构造toString是便于调试(因为他可以返回类中的所有属性)
1 2 3 4 5 6 7 8 9 10 11 12 13 14 15 16 17 18 19 20 21 22 23 24 25 26 27 28 29 30 31 32 33 34 35 36 37 38 39 40 41 42 43 44 45 46 47 48 49 50 51 52 53 54 55 56 57 58 59 60 61 62 63 64 65 66 67 68 69 70 71 72 73 74 75 76 77 78 79 80 81 82 83 84 85 86 87 88 89 90 91 92 93 94 95 96 97 98 99 100 101 102 103 104 105 106 107 108 109 110 111 112 113 114 public class desk { private boolean flag; private int count; private final Object lock = new Object (); public desk (int count, boolean flag) { this .count = count; this .flag = flag; } public desk () { this (10 , false ); } public boolean isFlag () { return flag; } public void setFlag (boolean flag) { this .flag = flag; } public int getCount () { return count; } public void setCount (int count) { this .count = count; } public Object getLock () { return lock; } @Override public String toString () { return "desk{" + "flag=" + flag + ", count=" + count + ", lock=" + lock + '}' ; } } public class Cooker extends Thread { private desk desk ; public Cooker (desk desk) { this .desk = desk; } @Override public void run () { while (true ) { synchronized (desk.getLock()) { if (desk.getCount() == 0 ) { break ; } else { if (!desk.isFlag()) { System.out.println("Cooker正在制作食物" + (11 - desk.getCount())); desk.setFlag(true ); desk.getLock().notifyAll(); } else { try { desk.getLock().wait(); } catch (InterruptedException e) { throw new RuntimeException (e); } } } } } } } public class Eater extends Thread { private desk desk; public Eater (desk desk) { this .desk = desk; } @Override public void run () { while (true ) { synchronized (desk.getLock()) { if (desk.getCount() == 0 ) { break ; } else { if (desk.isFlag()) { System.out.println("顾客在品尝食物" ); desk.setFlag(false ); desk.setCount(desk.getCount()- 1 ); desk.getLock().notifyAll(); } else { try { desk.getLock().wait(); } catch (InterruptedException e) { throw new RuntimeException (e); } } } } } } } public static void main (String[] args) { desk desk = new desk (); Cooker c = new Cooker (desk); Eater e = new Eater (desk); c.start(); e.start(); }
阻塞队列
常见BlockingQueue:
ArrayBlockingQueue: 底层是数组,有界
LinkedBlockingQueue: 底层是链表,无界.但不是真正的无界,最大为int的最大值
BlockingQueue的核心方法:
put(anObject): 将参数放入队列,如果放不进去会阻塞
take(): 取出第一个数据,取不到会阻塞
1 2 3 4 5 6 7 8 public static void main (String[] args) throws InterruptedException { ArrayBlockingQueue<String> arrayBlockingQueue = new ArrayBlockingQueue <>(1 ); arrayBlockingQueue.put("汉堡" ); System.out.println(arrayBlockingQueue.take()); System.out.println(arrayBlockingQueue.take()); System.out.println("程序结束" ); }
1 2 3 4 5 6 7 8 9 10 11 12 13 14 15 16 17 18 19 20 21 22 23 24 25 26 27 28 29 30 31 32 33 34 35 36 37 38 39 40 41 42 43 44 45 46 public class Cooker extends Thread { private ArrayBlockingQueue<String> bd; public Cooker (ArrayBlockingQueue<String> bd) { this .bd = bd; } @Override public void run () { while (true ) { try { bd.put("炸薯条" ); System.out.println("厨师放入一个炸薯条" ); } catch (InterruptedException e) { throw new RuntimeException (e); } } } } public class Eater extends Thread { private ArrayBlockingQueue<String> bd; public Eater (ArrayBlockingQueue<String> bd) { this .bd = bd; } @Override public void run () { while (true ) { try { String take = bd.take(); System.out.println("Eater将" + take + "拿出来吃了" ); } catch (InterruptedException e) { throw new RuntimeException (e); } } } } public static void main (String[] args) throws InterruptedException { ArrayBlockingQueue<String> bd = new ArrayBlockingQueue <>(1 ); Cooker c = new Cooker (bd); Eater e = new Eater (bd); c.start(); e.start(); }
线程池 static ExecutorService newCachedThreadPool() 创建一个默认的线程池static newFixedThreadPool(int nThreads) 创建一个指定最多线程数量的线程池
1 2 3 4 5 6 7 8 9 10 11 12 13 14 15 16 17 18 19 20 21 22 23 24 25 26 import java.util.concurrent.ExecutorService;import java.util.concurrent.Executors;public class MyThreadPoolDemo { public static void main (String[] args) throws InterruptedException { ExecutorService executorService = Executors.newCachedThreadPool(); executorService.submit(()->{ System.out.println(Thread.currentThread().getName() + "在执行了" ); }); executorService.submit(()->{ System.out.println(Thread.currentThread().getName() + "在执行了" ); }); executorService.shutdown(); } }
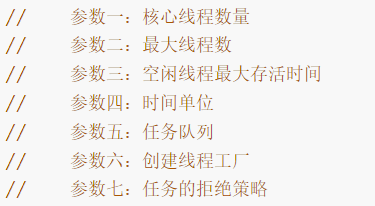
ThreadPoolExecutor threadPoolExecutor = new ThreadPoolExecutor(核心线程数量,最大线程数量,空闲线程最大存活时间,任务队列,创建线程工厂,任务的拒绝策略);
1 2 3 4 5 6 7 8 9 10 public static void main (String[] args) { ThreadPoolExecutor pool = new ThreadPoolExecutor (2 , 5 , 2 , TimeUnit.SECONDS, new ArrayBlockingQueue <>(10 ), Executors.defaultThreadFactory(), new ThreadPoolExecutor .AbortPolicy()); pool.submit(new MyRunnable ()); pool.submit(new MyRunnable ()); pool.shutdown(); }
任务的拒绝策略
1 2 3 4 ThreadPoolExecutor.AbortPolicy: 丢弃任务并抛出RejectedExecutionException异常。是默认的策略。 ThreadPoolExecutor.DiscardPolicy: 丢弃任务,但是不抛出异常 这是不推荐的做法。 ThreadPoolExecutor.DiscardOldestPolicy: 抛弃队列中等待最久的任务 然后把当前任务加入队列中。 ThreadPoolExecutor.CallerRunsPolicy: 调用任务的run()方法绕过线程池直接执行。
volatile volatile 强制线程每次使用时,更新一下共享区的值
1 2 3 4 5 6 7 8 9 10 11 12 13 14 15 16 17 18 19 20 21 22 23 24 25 26 27 28 29 30 31 32 public class money { public static volatile int money = 100 ; } public class MyThread extends Thread { @Override public void run () { while (money.money ==100 ) { } System.out.println("钱不是100了" ); } } public class MyThread2 extends Thread { @Override public void run () { try { Thread.sleep(10 ); } catch (InterruptedException e) { throw new RuntimeException (e); } money.money = 900 ; } } public static void main (String[] args) { MyThread m1 = new MyThread (); m1.setName("线程1" ); m1.start(); MyThread2 m2 = new MyThread2 (); m2.setName("线程2" ); m2.start(); }
当money没有被volatile修饰时,线程1会一直执行,因为在他的变量副本中money值一直都是100
使用同步代码块synchronized也可以
在公共资源类中,声明一个锁,然后将使用的线程分别用synchronized锁起来
1 2 3 4 5 6 7 8 9 10 11 12 13 14 15 16 17 18 19 20 21 22 23 24 25 26 27 28 29 30 31 32 33 34 35 36 37 38 39 40 41 42 43 public class money { public static Object lock = new Object (); public static volatile int money = 100 ; } public class MyThread extends Thread { @Override public void run () { while (money.money ==100 ) { synchronized (money.lock) { if (money.money != 100 ) { System.out.println("钱不是100了" ); break ; } } } } } public class MyThread2 extends Thread { @Override public void run () { synchronized (money.lock) { try { Thread.sleep(10 ); } catch (InterruptedException e) { throw new RuntimeException (e); } money.money = 900 ; } } } public static void main (String[] args) { MyThread m1 = new MyThread (); m1.setName("线程1" ); m1.start(); MyThread2 m2 = new MyThread2 (); m2.setName("线程2" ); m2.start(); }
原子性 volatile 不能解决原子性问题,但可以使用同步代码块
1 2 3 4 5 6 7 8 9 10 11 12 13 14 15 16 17 18 19 20 21 public class MyAtomThread implements Runnable { public static volatile int count = 0 ; public static Object lock = new Object (); @Override public void run () { synchronized (lock) { for (int i = 0 ; i < 100 ; i++) { count ++; System.out.println("已经买了" + count + "个冰激凌了" ); } } } } public static void main (String[] args) { MyAtomThread a = new MyAtomThread (); for (int i = 0 ; i < 100 ; i++) { new Thread (a).start(); } }
悲观锁 假设每次访问共享资源都会起冲突,会在访问资源前加一把锁,同一时刻只能有一个线程访问资源
适用于写操作多,冲突频繁 (不同线程修改共享资源操作多的情况)
同步代码块
乐观锁 假设每次访问共享资源不会起冲突,不会在访问资源前加锁,在更新数据时检查,如果数据发生改变,就回滚操作
适用于读操作多,冲突少
1 2 3 4 5 6 7 8 public AtomicInteger(): 初始化一个默认值为0的原子型Integer public AtomicInteger(int initialValue): 初始化一个指定值的原子型Integer int get(): 获取值 int getAndIncrement(): 以原子方式将当前值加1,注意,这里返回的是自增前的值。 int incrementAndGet(): 以原子方式将当前值加1,注意,这里返回的是自增后的值。 int addAndGet(int data): 以原子方式将输入的数值与实例中的值(AtomicInteger里的value)相加,并返回结果。 int getAndSet(int value): 以原子方式设置为newValue的值,并返回旧值。
网络编程 IP地址 :电脑在网络中的唯一标识 ipv4(四个8字节),ipv6(八组四个十六进制数)
ipconfig 查看本机的ip地址
端口:应用程序在设备的唯一标识
协议:数据在网络传输的规则,TCP协议 ,UDP协议
UDP 无连接
通讯方式:
单播 点对点 一个发送者对应一个接受者
组播 点对组 一个发送者对应一组接受者
广播 点对所有 一个发送者对应所有的接受者
单播写法
发送端
1 2 3 4 5 6 7 8 9 10 11 DatagramSocket ds = new DatagramSocket ();String s = "你好" ;byte [] bytes = s.getBytes();InetAddress address = InetAddress.getByName("127.0.0.1" );int port = 10000 ;DatagramPacket dp = new DatagramPacket (bytes, bytes.length, address, port);ds.send(dp); ds.close();
接收端
1 2 3 4 5 6 7 8 9 10 11 DatagramSocket ds = new DatagramSocket (10000 );byte [] bytes = new byte [128 ];DatagramPacket dp = new DatagramPacket (bytes, bytes.length);ds.receive(dp); byte [] data = dp.getData();System.out.println(new String (data)); ds.close();
组播写法
224.0.0.0——224.0.0.255为本地的组播地址
1 2 3 4 5 6 7 8 DatagramSocket ds = new DatagramSocket(); String s = "你好"; byte[] bytes = s.getBytes(); InetAddress address = InetAddress.getByName("224.0.1.0");//将原来那个回环地址‘127.0.0.1’改为组播地址‘224.0.1.0’ int port = 10000; DatagramPacket dp = new DatagramPacket(bytes, bytes.length, address, port); ds.send(dp); ds.close();
1 2 3 4 5 6 7 8 9 10 11 MulticastSocket ms = new MulticastSocket(10000);//记得写端口号 DatagramPacket dp = new DatagramPacket(new byte[1024], 1024); ms.joinGroup(InetAddress.getByName("224.0.1.0"));//加入组播组224.0.1.0 ms.receive(dp); byte[] data = dp.getData(); int length = dp.getLength(); System.out.println(new String(data, 0, length)); ms.close();
广播写法
1 2 3 4 5 6 7 8 9 10 11 DatagramSocket ds = new DatagramSocket ();String s = "广播" ;byte [] bytes = s.getBytes();InetAddress address = InetAddress.getByName("255.255.255.255" );int port = 10000 ;DatagramPacket dp = new DatagramPacket (bytes, bytes.length, address, port);ds.send(dp); ds.close();
1 2 3 4 5 6 7 8 9 10 11 DatagramSocket ds = new DatagramSocket (10000 );DatagramPacket dp = new DatagramPacket (new byte [1024 ], 1024 );ds.receive(dp); byte [] data = dp.getData();int length = dp.getLength();System.out.println(new String (data, 0 , length)); ds.close();
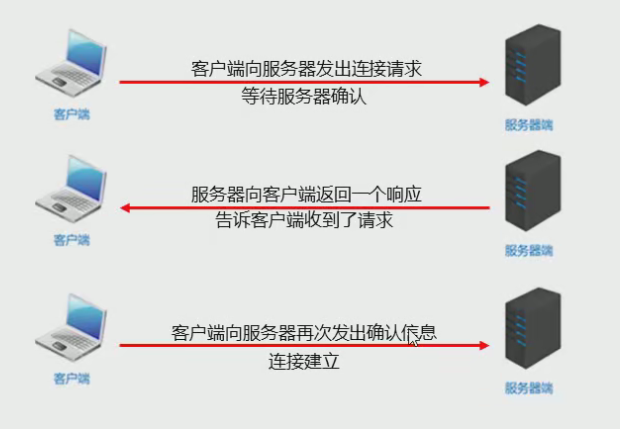
TCP 三次握手:
四次挥手
面向连接
1 2 3 4 5 6 Socket socket = new Socket("127.0.0.1", 10005);//连接指定服务器 OutputStream os = socket.getOutputStream();//获取输出流 os.write("hello".getBytes());//输出数据 os.close();//关闭资源 socket.close();
1 2 3 4 5 6 7 8 9 10 11 ServerSocket ss = new ServerSocket(10005);//创建服务器 Socket accpet = ss.accept();//等待与客户端连接 InputStream is = accpet.getInputStream();//获取输入流 int b ; while((b = is.read()) != -1) {//读取数据 System.out.print((char) b); } is.close();//关闭资源 accpet.close(); ss.close();
UUID UUID可以通过多种方式生成,包括随机生成或基于特定属性,如当前时间、主机的MAC地址或其他唯一信息。
可以用来随机生成文件名